This article describes the use of
forward-auth, a new plugin in Apache APISIX, and provides detailed instructions on how to use this cleanly designed authentication model.
Forward Auth cleverly moves the authentication and authorization logic to a dedicated external service, where the gateway forwards the user's request to the authentication service and blocks the original request and replaces the result when the authentication service responds with a non-20x status. In this way, it is possible to return a custom error or redirect the user to the authentication page if the authentication fails.
Principle

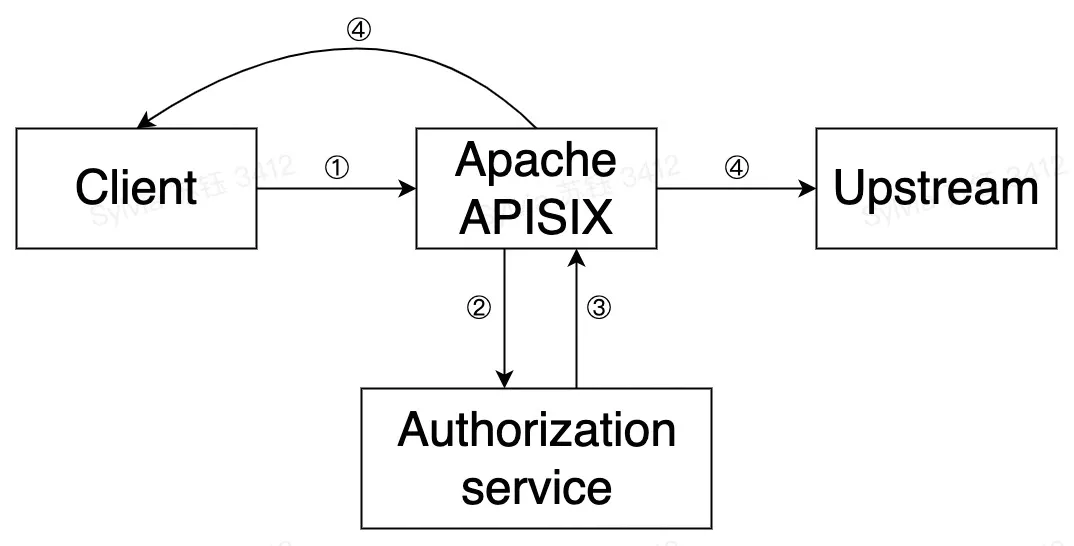
The principle and flow of the forward-auth plugin in Apache APISIX is shown in the figure above and is summarized in the following steps.
- Step 1: A request is made by the client to APISIX
- Step 2: APISIX makes a request to the user-configured authentication service
- Step 3: The authentication service responds (2xx or exception status)
- Step 4: Based on the authentication service response, APISIX will decide to forward the request upstream or send a rejection response directly to the client
How to use
Step 1: Set up the authentication service
Suppose there is an authentication service to which the user sends a request with an Authorization request header. If this data passes authentication, a 200 status code and a response header named X-User-ID are returned; if it does not pass authentication, the authentication status is considered expired and a 302 status code and Location response header are returned to redirect the client to the login page.
Step 2: Create a route and enable the forward-auth plugin
Next, we will configure a route and enable the forward-auth plugin to interface the above authentication service with the upstream application.
curl http://127.0.0.1:9080/apisix/admin/routes/1 -H 'X-API-KEY: edd1c9f034335f136f87ad84b625c8f1' -X PUT -d '
{
    "plugins": {
        "forward-auth": {
            "address": "http://127.0.0.1:9080/auth",
            "request_headers": ["Authorization"],
            "upstream_headers": ["X-User-ID"],
            "client_headers": ["Location"]
        }
    },
    "uri": "/user"
}'
The above configuration details are explained.
- When a request matches the current route, a request is sent to the
addressin address with the request header Authorization defined inrequest_headers(i.e., the request header configured to be forwarded by the client to the authentication service, if not set, no request header is forwarded), whereby the authentication service can confirm the user's identity. - If the authentication passes, the status code is 200 and returns an
X-User-IDas defined inupstream_headers(i.e. the request header to be forwarded upstream by the authentication service when the authentication passes, if not set, no request header is forwarded). - If authentication fails, the status code is 302 and returns a
Locationas defined inclient_headers(i.e., the response header sent by the authentication service to the client if authentication fails, or no response header if it is not set).
Step 3: Test Requests
# Request and send data using POST
curl http://127.0.0.1:9080/user \
    --header 'Authorization: true'

HTTP/1.1 200 OK
Content-Type: application/json
Content-Length: 28
Server: APISIX/2.11.0

{"user_id":"i-am-real-user"}

# Request using GET
curl -i http://127.0.0.1:9080/user \
    --header 'Authorization: false'

HTTP/1.1 302 FOUND
Server: APISIX/2.11.0
Location: https://example.com/auth
Addendum: Disable the plugin
If you have finished using the Forward Auth plugin, simply remove the forward-auth plugin configuration from the route configuration and save it to turn off the Forward Auth plugin on the route.
Thanks to the dynamic nature of Apache APISIX, there is no need to restart Apache APISIX to turn the plugin on and off.
Summary
To get more information about the forward-auth plugin description and full configuration list, you can refer to the official documentation. Also, if you have more complex authentication or authorization application scenarios, try using the opa plugin, which allows for more powerful functionality in a programmable way.
Apache APISIX is also currently working on additional plugins to support the integration of additional services, so if you are interested, feel free to start a discussion in GitHub Discussion, or via the mailing list to communicate.
